
How and Why I Edit Photos
Not very many people are aware of exactly how important editing is in the art of photography. Heck, even back before Photoshop was around, photographers were editing photos via dodging and burning in the dark room, to really make their photographs be the best they can possibly be (yes, I realize that sounds very similar to the Army marketing campaign, but it's totally true!). A little editing usually makes a huge difference to a photo that's straight out of the camera (SOOC).
When a client hires me for a photography session, not only are they paying me for my time and skill for a photo shoot, they are also paying me for many more hours spent editing their photos. I take pride in my work, and I strive to deliver the best experience and absolute best product I possibly can. I want my clients to not just like their photos, but LOVE them, for many years to come.
Does editing really make that much of a difference? Just take a look at the example below, showing a photo straight out of the camera (before editing), and after editing:
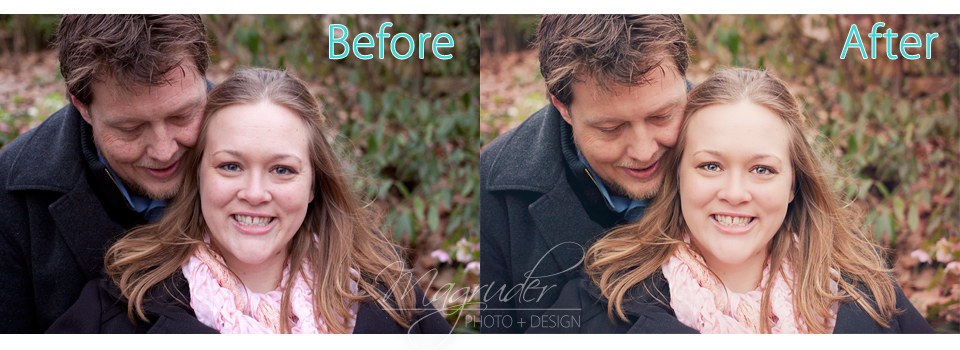
Pretty big difference, isn't it?
Shooting in RAW vs JPEG Files
Most photographers (including me), shoot in the RAW format versus the JPEG format. It's a setting you select on your camera before you start shooting, and the two formats are vastly different. The RAW file format is very similar to a film version of a negative - it comes out of the camera exactly as the camera captured it. There is no compression, no enhancements - nothing is done to the image. The JPEG file format, on the other hand, is usually compressed so the file size is smaller, and usually has some sharpening, noise reduction, and other filters applied to it in-camera.
Many photographers prefer to shoot in RAW because there is more of the image, so to speak, to work with in post-processing, as everything is saved exactly as it was captured on the camera - there has been no loss of pixels, as is usually the case with shooting in JPEG format. However, RAW images tend to be a bit fuzzy and "murky", and do require additional editing to reach a decent "base" image to work with, on top of the usual post-processing edits I like to perform.

Some photographers prefer to do little-to-no editing, while some rather enjoy it and use the tools available to help enhance the photos to create the image they see in their mind. Personally, coming from a graphic design background, I am in the latter category. While I do some very light retouching on faces because I want my clients to actually look like themselves, I enjoy playing with various other editing techniques to create the feeling and mood I want the image to portray.
Of course, no amount of editing will EVER create an amazing image from a bad photo. You have to start with a great photo, and with the right touches and edits applied, it can be enhanced to create an astounding work of art.
My Editing Process
I won't go into the very specifics of it, but I will do an overview of what my editing process entails.
After I've culled through and sorted out the best images from a session, I will import the RAW files into a program called Adobe Camera Raw. This is where I adjust some basic settings to reach a good base image to work with. I typically adjust the white balance to add a little warmth to the image - unless I've already done that during the shoot, that is - and make a few other small adjustments to the image.

Once those are done and I've reached a good base to work from, I will import the photo into Adobe Photoshop for some more photo-specific editing.
Typically, I will sharpen the image slightly, as well as smooth out the skin tone, if needed. Then I will apply some curves to make the image pop, lighten the eyes a bit, and finally add in some filters for the end result.

So there you have it!
An overview of shooting in RAW vs JPEG, as well as an overview of my own personal editing process. Every photographer's style - in shooting as well as editing - is completely unique, so I really urge clients to review their potential photographer's website or portfolio before hiring to have an idea of what to expect from their own future shoot.
And just for fun, here are some more examples of Before and After edits!


When a client hires me for a photography session, not only are they paying me for my time and skill for a photo shoot, they are also paying me for many more hours spent editing their photos. I take pride in my work, and I strive to deliver the best experience and absolute best product I possibly can. I want my clients to not just like their photos, but LOVE them, for many years to come.
Does editing really make that much of a difference? Just take a look at the example below, showing a photo straight out of the camera (before editing), and after editing:
Pretty big difference, isn't it?
Shooting in RAW vs JPEG Files
Most photographers (including me), shoot in the RAW format versus the JPEG format. It's a setting you select on your camera before you start shooting, and the two formats are vastly different. The RAW file format is very similar to a film version of a negative - it comes out of the camera exactly as the camera captured it. There is no compression, no enhancements - nothing is done to the image. The JPEG file format, on the other hand, is usually compressed so the file size is smaller, and usually has some sharpening, noise reduction, and other filters applied to it in-camera.
Many photographers prefer to shoot in RAW because there is more of the image, so to speak, to work with in post-processing, as everything is saved exactly as it was captured on the camera - there has been no loss of pixels, as is usually the case with shooting in JPEG format. However, RAW images tend to be a bit fuzzy and "murky", and do require additional editing to reach a decent "base" image to work with, on top of the usual post-processing edits I like to perform.
Some photographers prefer to do little-to-no editing, while some rather enjoy it and use the tools available to help enhance the photos to create the image they see in their mind. Personally, coming from a graphic design background, I am in the latter category. While I do some very light retouching on faces because I want my clients to actually look like themselves, I enjoy playing with various other editing techniques to create the feeling and mood I want the image to portray.
Of course, no amount of editing will EVER create an amazing image from a bad photo. You have to start with a great photo, and with the right touches and edits applied, it can be enhanced to create an astounding work of art.
My Editing Process
I won't go into the very specifics of it, but I will do an overview of what my editing process entails.
After I've culled through and sorted out the best images from a session, I will import the RAW files into a program called Adobe Camera Raw. This is where I adjust some basic settings to reach a good base image to work with. I typically adjust the white balance to add a little warmth to the image - unless I've already done that during the shoot, that is - and make a few other small adjustments to the image.
Once those are done and I've reached a good base to work from, I will import the photo into Adobe Photoshop for some more photo-specific editing.
Typically, I will sharpen the image slightly, as well as smooth out the skin tone, if needed. Then I will apply some curves to make the image pop, lighten the eyes a bit, and finally add in some filters for the end result.
So there you have it!
An overview of shooting in RAW vs JPEG, as well as an overview of my own personal editing process. Every photographer's style - in shooting as well as editing - is completely unique, so I really urge clients to review their potential photographer's website or portfolio before hiring to have an idea of what to expect from their own future shoot.
And just for fun, here are some more examples of Before and After edits!

Comments
Post a Comment